How to get started with astrophotography: a guide for smartphone snappers
If you want to shoot the Moon, expose the stars and explore hidden galaxies, you'll want to try astrophotography. Here's how to get started with astrophotography using nothing but your smartphone.
Every night I look up and think how incredible the night sky looks. But raising my smartphone and snapping a pic of the Moon just looks like I’m shooting a pic of a blurry lamp across a room. Here’s how I got started with astrophotography using just my smartphone. And how you can do it too.
@telstrawhy is it better than my eyes
♬ stay focused - anakin
Astrophotography with a professional DSLR camera can come pretty easy. A lot of them are already geared toward taking great photos of the night sky. Your smartphone, however, requires a different approach.
Before you step out into the night for your first session, you’ll need to remember a few things. It involves research, planning, the right gear, and a few editing tricks to really make your pics pop.
Click to expand each tip below and start your astrophotography adventures.
Happy stargazing!
How to get started with astrophotography
Before diving into astrophotography, acquaint yourself with the night sky around you. It’s different for everyone!
Leverage apps like Stellarium, SkyView, or Night Sky Map to identify constellations, planets, and other celestial objects. These apps allow you to track what’s directly above you and identify potential points of interest for future shoots.
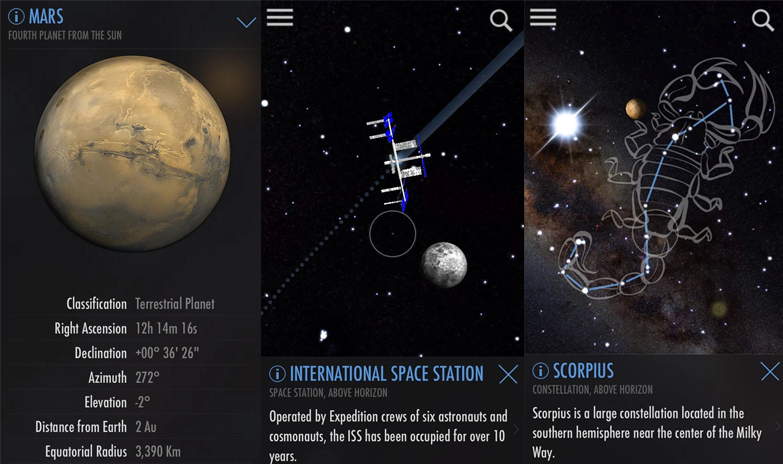
The best apps like SkyView, for example, will also allow you to use Augmented Reality (AR) to visualise the night sky. You can point your phone at the night sky and understand what’s above you right now, and when something will come into your skyscape.
Understanding the basics, such as moon phases and star locations, sets the stage for successful astrophotography.
Take a look at a star chart before you go to find out the time for best results.
No need to invest in expensive camera gear. Your smartphone can be a powerful astrophotography tool. Ensure your phone is fully charged and consider additional accessories like a tripod for stability during long exposures.
What you really want to do is get to know your settings. These are key to capturing the right shots of the night sky.
We’ll dive into a few of them here, but you should really experiment with your smartphone camera’s manual mode to get the best results. If your phone camera doesn’t have manual modes, try a third-party app like Halide, NightCap or ProCamera, for example.
Exposure and ISO settings
These both control the light that gets into your camera. Here's how.
ISO Settings
Your ISO controls how sensitive your camera is to light. The more light you have, the lower your ISO should be set to. With astrophotography, you won’t have much light at all, so make sure you set your ISO as high as you can without producing graininess in your image.
Start with a lower ISO setting (100-400) to minimise “digital noise”, then work up to higher ISO. Higher ISO values may brighten the image but can introduce that unwanted graininess. Find the right balance for you.
Exposure
Exposure is basically how much light can reach your camera’s sensor. It’s controlled by the Aperture (or f-stop) and Shutter Speed. For astrophotography in particular, you’ll need a much longer Shutter Speed (or how long the lens is open) to capture the right images.
Experiment with exposure settings based on the brightness of the night sky. For brighter scenes, use shorter exposure times (around 10-20 seconds). In darker environments, consider longer exposures (up to 30 seconds) to capture more details.
Focus settings
Focus settings help you set the distance between your camera and your subject. Because you’re millions of miles away from the stars, set your focus to “Infinity” (∞) to ensure the right focus.
You may need to muck about with this a little, as a smartphone camera sensor may recognise some objects as being closer than they appear.
Take a few test shots to check focus. Adjust the manual focus until stars appear sharp and well-defined in your frame.
Zoom: digital versus optical
Most smartphones use “digital zoom”. This is where it punches in on the image without getting any closer using optics. It’s a bit of trickery designed to make you think it’s zooming in when really, it’s a digital crop.
Optical zoom will always get you the best results. Check your smartphone to see how far you can punch in with your optical zoom rather than relying on digital zoom alone.
If you’re stuck with digital zoom, consider cropping your photo in post-processing for better results. That way you don’t lose any detail when you snap.
Stabilisation
If you have the shutter speed set high (which you’ll need to), you’ll want to make sure your phone doesn’t move about while it’s exposing the image.
That’s why stability is crucial for astrophotography. Invest in a smartphone tripod or find a stable surface to eliminate camera shake during long exposures.
Alternatively, you can use a remote shutter release. Most smartwatches when paired with a smartphone (on Android or iOS) have a shutter remote. If you don’t have one of these, you can set a three-second self-timer that will allow you to clear the area around the device after you hit the button on the phone.
Test and adjust to get it right
Remember, you won’t get it right on the first go. Take a series of test shots to fine-tune your settings. Adjust exposure times, ISO, and focus until you achieve the desired results.
Kick off your astrophotography journey by focusing on easily identifiable celestial elements. Here are a few points of interest to get you started.
The Moon
Experiment with different phases, zoom levels, and exposures to capture the intricate details of the moon's craters and textures.
Constellations
Begin with well-known constellations like Orion, the Southern Cross, the Big Dipper, Cassiopeia, and Ursa Major. Utilize your smartphone's night mode or explore long-exposure apps to highlight their brilliance.
Star trails
Set your phone on a stable surface, enable a long exposure, and capture the mesmerising trails formed by the Earth's rotation.
Planets
Capture the brilliance of visible planets such as Jupiter and Saturn. Apps like SkyView or Star Walk can assist in locating these celestial wonders.
The International Space Station (ISS)
Track the ISS as it orbits the Earth. Apps like SkyView or Heavens-Above provide real-time information on ISS sightings.
Once you’ve got the hang of it, you can spend a bit of money to get better gear.
If you want to get really technical, you can look into purchasing an actual telescope that will get you closer to the stars and planets than ever.
Many telescopes for sale these days take astrophotography into account with their designs and offer ways for you to either mount or pair your smartphone wirelessly for great results.
If you're ready to invest in a telescope, consider the following:
Aperture
Look for telescopes with larger apertures, as they gather more light and provide clearer views.
Mount Type
Equatorial mounts are preferred for astrophotography, as they can track celestial objects smoothly.
Portability
Consider the size and weight of the telescope, especially if you plan to travel for stargazing sessions.
If you want to go even more advanced, you can consider different lenses for your telescope (such as a Barlow Lens), filters to reduce light pollution or a collimator to make viewing your images easier.
Once you've captured your celestial wonders, the real magic happens in the editing room. Here's a step-by-step guide on how to edit your astrophotography masterpieces using Adobe Lightroom (if you’re a laptop or tablet user) or Snapseed (if you’re a mobile user):
Adobe Lightroom
Try these tips in your adjustments to get the best results.
Adjust Exposure and Contrast:
- Increase exposure slightly to bring out details in the dark areas.
- Adjust contrast to enhance the separation between celestial elements.
Fine-Tune Highlights and Shadows:
- Reduce highlights to prevent overexposure in bright areas.
- Boost shadows to reveal details in darker regions.
Adjust Temperature and Tint:
- Fine-tune the colour temperature to achieve a natural look.
- Adjust tint if necessary to balance colours.
Enhance Clarity and Texture:
- Increase clarity to sharpen details.
- Adjust texture to enhance fine details in the night sky.
Reduce Noise:
- Use the noise reduction tools to minimize graininess, especially in darker areas.
Add a touch of Vignette:
- Apply a subtle vignette to draw attention to the centre of the image.
Experiment with Presets:
- Explore astrophotography presets for a quick and unique edit.
Snapseed
Snapseed is one of the best mobile photo editing apps out there. Made by Google, it’s free and easy to use. To master it with your astrophotography shots, try these tips.
Tune Image:
- Adjust brightness, contrast, saturation, and ambiance for overall enhancements.
Details:
- Use the details tool to sharpen important elements of the night sky.
Curves:
- Fine-tune the brightness and contrast curve for a personalised touch.
White Balance:
- Adjust temperature and tint to achieve the desired colour balance.
Glamour Glow (Optional):
- Add a subtle glow to celestial elements for a dreamy effect.
HDR Scape (Optional):
- Experiment with the HDR Scape tool for added drama.
Selective Editing:
- Use the selective editing tool to adjust specific areas if needed.
Patience is key in astrophotography. Embrace the learning curve, keep practicing, and most importantly, relish the process of capturing the cosmos from your own backyard and beyond.